One of the main attractions of MIG/MAG welding (Inert/Active Protective Gas Arc Welding, respectively) is the ease of learning. With a little instruction, virtually anyone can weld using MIG/MAG after a few hours of practice. In fact, the more you practice, the easier it will be and the better the welds will be. However, before relying too much on our welds, it’s a good idea to cut a bead we’ve made to check for penetration and other features that will tell us if the weld is as strong as it looks.
The advantage of starting with MIG welding
Contents
The great advantage of the MIG/MAG process is that the welding gun can be handled with only one hand, allowing the other hand to be used to stabilize the primary hand and trace an even bead.
The gun also remains at the same distance from the weld at all times, unlike arc welding, where the rod becomes shorter and shorter. MIG/MAG welding also doesn’t require us to stop to change the electrodes, so we can concentrate on what we’re doing.
How to start welding with MIG?
To fine-tune our MIG/MAG equipment and start welding, the first step is to read all the instructions and precautions included in the corresponding user manual. We recommend that you briefly review the components of MIG welding equipment so that you are clear about what you need to do to set up the machine correctly.
Once we are familiar with the components of your equipment and have chosen the type of gas and the type of wire to be used, we will pay special attention to a series of key parameters that we must adjust to obtain a quality weld. These parameters are:
- Current intensity: controls heat input, weld size, and penetration depth.
- Arc Voltage: Controls the weld profile.
- Wire feed speed: controls the intensity of the weld.
- Wire diameter: depends on its feeding speed, current intensity, protective gas, and the material to be welded.
More about the right setting here!
We must also take into account the flow of the protective gas (depending on the material and the wire used), the length of the stick-out at the end of the nozzle, and the movement speed.
I know the basics, what’s next?
All these parameters are set according to the manufacturer’s instructions and there are also tables in specialized welding manuals. In addition, constant practice teaches a lot. Once we have set these parameters, we are ready to start the process. To do this:
- We connect the selected nozzle and the contact tip to the welding gun.
- We install the wire roll and regulate the wire feed speed.
- Press the trigger of the gun until approx. 6 mm of wire protruding from the nozzle. If it protrudes more, cut off the surplus with pliers.
- Open the protective gas cylinder and press the gun trigger again to purge the air from the hoses and adjust the flow meter to the desired flow value.
- Graduate the voltage and current of the equipment, according to the type and thickness of metal to be joined.
- Create the arc by pulling the trigger while aiming for the base metals. To extinguish the arc, separate the gun from the metal or release the trigger. If the wire sticks to the metal, release the trigger and cut the wire with MIG pliers.
- To deposit a great welding bead, we must heat the metal forming an incandescent zone and then move the gun along the joint, maintaining a steady speed to achieve a smooth and even welding bead.
Steps 1 and 2 are essential for the proper functioning of the equipment. It is very common that in the MIG/MAG welding the operator forgets to change the nozzles and/or the wires and rollers from one setting to another, and this is translated in bad quality of the obtained welds and in some rare cases damages to the equipment.
The wire feed speed is also very important to obtain a good weld with the right heat and penetration. Adjusting the speed is not complicated. Simply listen to the sound the arc while depositing a straight bead. If the speed is too fast, most of the wire coming out of the nozzle will be red hot and there will be a loud crack. Therefore, you need to gradually adjust the speed until you get a constant sizzling sound.
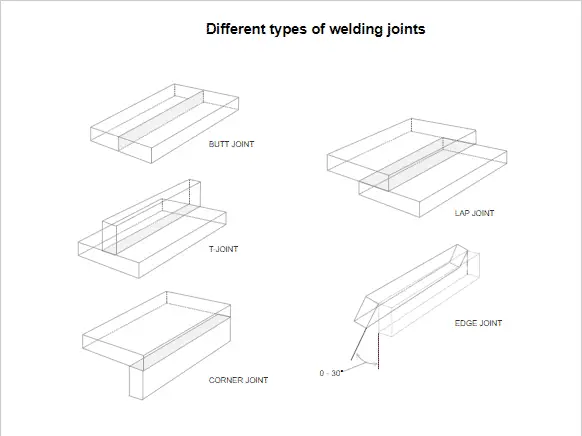
Types of joints and types of welding
There are different types of joints and different types of welding methods, completely independent of each other, which can be carried out by means of MIG/MAG welding. The position of the gun, as well as the movement and movements described by the gun along the workpiece, also vary. Each variable responds to the type and thickness of the metal to be welded, the diameter of the nozzle and the wire, the wire distance from the nozzle and to the workpiece and many other factors.
The image below summarizes the main types of joints in MIG/MAG.
Position of the gun
The most recommended is the horizontal or almost horizontal position since it allows better control over the puddle, smooth and good looking beads can be obtained and it optimizes the action of the protective gas on the puddle. However, there are cases in which it is convenient to weld on inclined pieces about 10 or 20 degrees. If this is the case, the welding is done in descending order. With this method, flatter seams are obtained and the moving speed is increased.
Movement of the welding gun
In MIG/MAG welding there are two ways of moving the gun besides different motions like zig-zag and circles:
- To the left: the movement of the pistol goes from right to left
- To the right: the movement of the pistol goes from left to right
These variables depend on the material, position and the thickness of the metals and the type of wire you are using. For welding steel or similar metals, the welding direction is not relevant in the flat position.
Again, depending on the metal to be welded and the application of the products that are being welded, there are three types of transfer of the filler metal.
- Short circuit transfer: in this case, the voltage and amperage are at their lowest value. This technique is used with small diameter wires to weld thin plates with root passes.
- Globular transfer: the wire melts and the cells fall into the puddle. This technique is suitable for welding thick plates and filler layers.
- Spray transfer: In this case the voltage and amperage increase and decrease rapidly. The technique is used under inert gas and is suitable for welding stainless steel and other metals that need to be porosity free. You can read more about it here!
Conclusion
As you can see, in MIG/MAG welding there are a lot of variables to consider and experience will teach us to know them and handle them according to our needs until we reach a good degree of improvement.
It is reasonable to suppose that inconveniences may arise not only during the welding process but also defects in the welds obtained. In addition, we will have to carry out simple maintenance of the MIG/MAG equipment to avoid a great part of these inconveniences and, it goes without saying, during the whole operation we will have to have adequate protective equipment and observe the corresponding safety measures to prevent serious personal injuries