MIG welding is also called as Gas Metal Arc Welding (GMAW) is a type of welding that is done using a continuously fed MIG wire electrode and a shielding gas that melts and deposits the workpiece metal in the weld joint. The shielding gas that is fed through the welding gun helps in protecting the workpiece from getting contaminated by the various contaminants in the air. In this article, we are going to take a look at how to set up a MIG welder along with various other information like how to set up wire welder with gas, Metal Inert Gas Welding procedure, what is GMAW welding used for, etc.
The MIG welding Procedure
Contents
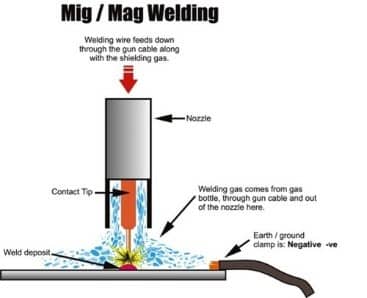
Unlike other manual welding processes, the mig welding is quite simple and doesn’t require coordinated operation as anyone can gain proficiency in less than few weeks. In this kind of welding, the welder is required to guide the welding gun along the proper position and orientation over the work piece and the area being welded. It is simply a process of joining metals together by passing heat between the workpiece and the wire electrode.
What is MIG welding used for?
Productivity
The most important benefit in using mig welding is to increase the productivity and it doesn’t create a lot of mess around in the workplace when compared with other welding processes. Hence, less amount of cleaning time is required once the job is completed. And the welder doesn’t need to change the rods frequently or chip away the slag and thus increasing your productivity by a great extent.
Reduced Costs
When compared with other welding methods, the equipment needed for Gas Metal Arc Welding costs much less as you can buy the machine for less than $500 along with the costs included for buying the suitable wire and gas and you can start welding right away. For a small welding company, MIG welding is both cost-saving as well as getting more jobs done in a short period of time.
Easy to Learn & Setup
Mig welding process is quite easy to learn as even beginners can gain proficiency in the job in less than a couple of weeks. That is the reason, lot of people mig welding when starting to learn welding.
Good Quality
Since shielding gas is used to protect the arc from all contaminants from the air, the result is excellent and clean. The welder also can customize the wire feed the voltage settings according to their requirements which makes the job much easier.
Welder Set-up
Setting up the wire welder is not a complicated process. Let’s take a look at How to set up a big welder below:
Before you assemble the mig welder, you need to take care of few things which include:
- Make sure the proper power source is available
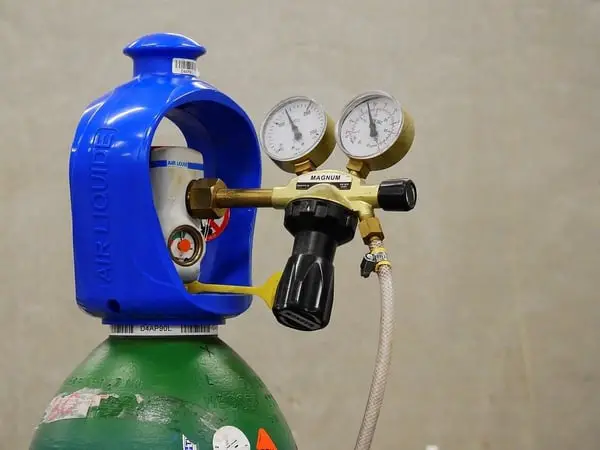
- A bottle of shielding gas and a gas regulator
- Welding wire
- The MIG welder machine
- Ground clamp, which needs to be connected to the work surface
- Welding mask, jacket and a pair of welding gloves
Once you have all the components available, it time to start setting up the welder. If you are looking for a new machine, then check out our wire feed welder buyer’s guide.
Prepare the Joint
Before assembling the machine, (or at least before you start welding) make sure that you have a properly set-up joint as any rust, paint or oil on the surface will produce a poor weld. So you need to make sure the weld area is cleaned properly of any kind of dirt or rust. Cleaning is extremely important as dirty joints will also lead to getting burns or even start a fire in the workplace.
Right Kind of Gas and Filler Wire
The gas and the filler wire are the major components in the setup and hence you need to ensure that you have the right kind of gas and the filler wire. Because of you are using carbon steel, you need to use ER70s electrode with C25 gas, whereas when you use Aluminum, you need to have ER4043 with 100% Argon gas.
MIG welding setting
Having the correct settings is extremely important to get the desired output as the settings may vary based on the type of metal you will be welding. Unlike other welding methods, there is no universal setting that can work for every metal type you will be welding. And also the thickness of the metal plays a huge impact on the settings. And when it comes to Mig welding setting, there are only 3 main settings that you need to set before you begin the welding process:
- Voltage Setting
- Wire Feed Speed Setting
- Gas Flow Rate Setting
These are the main setting that will help in controlling the heat and producing a proper output according to your requirements. But there are some new models available in the market that only requires the metal thickness and it will automatically set the wire feed speed and the voltage levels. But it is better to know about all three settings if you want to have a clear understanding about the setup.
Voltage Settings
In most of the machines, only DC voltage is used where you can say that handle of the machine is the positive where the electricity flows into the welding handle from the metal (DCEP). It is the voltage setting that determines the penetration and normally a chart or manual will be provided with the machine to adjust the voltage settings. But if don’t have any kind of manual, then you can start adjusting the voltage and wire speed while welding until you see that the arc gets stubbed into the workpiece. Adjust the level again until the arc becomes feeble and sloppy. So now you know the min and max settings range, so better set to the halfway point between the min and max and you that means it the voltage level should be perfect for the workpiece and you can continue with the welding process.
You can use this chart as a guide, feel free to play a little with the settings on your own to find what feels best.
| Maximum amperage | 90 | 110 | 130 | 150 | 180 |
| Max thickness for butt joints | 5/64 | 3/32 | 1/8 | 5/32 | 13/64 |
| Max thickness with V cap | 1/8 | 5/32 | 9/64 | 15/64 | 19/64 |
Wire Feed Speed Setting
Wire feed setting determines how quickly the wire is fed into the weld joint. It is regulated in Inches Per Minute (IPM). It is also used in controlling the amperage to some extent. High speed can cause the lead to burn-through and fast popping sound whereas low speed can cause it to burn too slow creating an unstable arc. Use the chart below to set the wire speed based on the wire size. For example, if the wire size is 0.23 inches (used for sheet metal), then you need to multiply by 3.5 inches per amp, which leads to 3.5 x 125 = 437.5 ipm
- .023 inch Multiply by 3.5 inches per amp
- .030 inch Multiply by 2 inches per amp
- .035 inch Multiply by 1.6 inches per amp
- .045 inch Multiply by 1 inch per amp
Since picking the right settings is a really common problem among welders, I decided to create a more in-depth table for you. Here you can see estimated voltage to choose, with amperage depending on the thickness of the material you are welding, as well as recommended wire size. hope this MIG welding wire speed and voltage chart helps.
If still, something seems unclear, feel free to drop us a comment below.
| MIG solid Wire | MIG solid steel thickness | wire feed speed .030 (IPM) | wire feed speed .035 (IPM) | 75-25% Argon (volts) | co2 volts | amps |
| 22ga | 90-100 | 15-16 | 16-17 | 40-55 | ||
| 20ga | 120-130 | 105-115 | 15-16 | 17.18 | 50-60 | |
| 18ga | 150-170 | 140-160 | 16-17 | 18-19 | 70-80 | |
| 16ga | 220-250 | 180-220 | 17-18 | 19-20 | 90-110 | |
| 14ga | 250-340 | 240-260 | 17-18 | 20-21 | 120-130 | |
| 1/8in | 280-300 | 18-19 | 21-22 | 140-150 | ||
| 3/16in | 320-340 | 18-19 | 21-22 | 160-170 | ||
| 1/4in | 360-380 | 21-22 | 23-24 | 180-190 | ||
| 5/16in | 400-420 | 21-22 | 23-24 | 200-210 | ||
| 3/8in | 400-520 | 24-24 | 24-25 | 220-250 | ||
| MIG stainless steel | .035 wire speed (IPM) | voltage helium+argon+co2 | amps | |||
| 18ga | 150-150 | 19-20 | 50-60 | |||
| 16ga | 180-205 | 19-20 | 70-80 | |||
| 14ga | 230-275 | 20-21 | 90-110 | |||
| 12ga | 300-325 | 20-21 | 120-130 | |||
| 3/16in | 350-375 | 20-21 | 140-150 |
Gas Flow Rate Setting
Last in the settings is the gas flow rate setting that helps in regulating the transfer of gas that is enough to protect the weld area from the contaminants in the air. Lower gas flow rate settings will allow only lesser gas which means it will not be enough to shield the weld area and which would result in porosity in the surface of the weld. Gas flow rate setting is regulated in Cubic Feet Per Minute (CFM). The setting should not be too high or too low as higher gas flow may result in causing turbulence and can suck in more air leading to weld contamination. Make sure to do some trial and error weld doing some test welds to determine the perfect gas flow rate before going on with the real job. Make sure to set proper MIG welding settings for mild steel along with other kinds of metals.
The optimal gas pressure going into the hose varies a little, but it should be around 15-25 CFH
Picking the Right MIG Wire
Once you have the MIG welding setting done, you need to install the wire onto the welding machine. And when it comes to selecting wire sizes, you need to always go with a thicker wire when you are welding thicker metals. There is also a wire speed and voltage chart provided with some machines that specify the right kind of wire size for various metal sizes. Or if you don’t have a manual, you can use the sizes below for reference:
- 0.23″ wire – Great for small welding machines used to weld thin sheet metals from 24-16 gauge
- 0.3″ wire – This is the wire size that normally comes with the MIG welder as it is the best size to weld metals around 1/8 inches thickness
- 0.35″ wire – best size to weld metals around 1/4 inches thickness. Good choice for beginners to learn the trade
- 0.45″ wire – best size to weld metals around 1/4 inches thickness. Perfect for industrial welding
If you struggle to find a good welding wire, with confidence I would recommend you to use this one: https://amzn.to/35EV4XL
INEFIL really makes great wire and as a hobby welder with 0.030-inch one you can weld most things.
Installing MIG wire
So now you have chosen the size of the wire according to your requirement, now it’s time to install it into the welder. Please follow the steps below to install the MIG wire.
- Remove the nozzle and contact tip
- Open the cabinet of the machine
- Unscrew the cap from the spindle and gently insert the wire spool into it
- Open the pressure release on the feeder and adjust the tightness by twisting the pressure roll
- Through the drive roll entry, gently insert the MIG wire
- Ensure the wire is straight and not bent
- Recap the spool of wire
- Press the trigger to start inserting the wire through the welding gun.
- Put the contact tip and the nozzle back on to the machine
- And now you’ve successfully inserted the MIG wire onto the machine and ready to start welding.
If you have any additional questions, feel free to comment below and I try to elaborate steps mentioned further if necessary.

Share this Image On Your Site
Click to open the picture in a new tab to zoom in. Also, feel free to share this picture.